Monday 30 May 2011

Toronto, Graffiti - Art or Vandalism?

Hi,
I had a chance to walk 28 May 2011 at corner of Bathurst and Queen.
I saw graffiti on walls of some buildings and I decided to make some pictures.


I was going that direction:


When I was making next picture, old guy told me "It is sad, but current Toronto mayor wants remove all these pictures from Toronto streets".


I never liked politic, but it bacame interesting case for me. I started look for information in internet and here is what I found:

Here is a link on wikipedia about all mayors of Toronto.
http://en.wikipedia.org/wiki/List_of_mayors_of_Toronto

In 2005, then-mayor David Miller signed an anti-graffiti bylaw that makes a distinction between graffiti (illegal) and art murals (legal).
http://www.toronto.ca/legdocs/municode/1184_485.pdf
http://www.toronto.ca/graffiti/

What’s graffiti?: According to the city, graffiti is “one or more letters, symbols, figures, etching, scratches, inscriptions, stains or other markings that disfigure or deface a structure or thing … [Graffiti] does not include an art mural.”

What’s an art mural?: An art mural is “a mural for a designated surface and location that has been deliberately implemented for the purpose of beautifying the specific location.”

Hotspots: The Scarborough RT line (near Lawrence) and the Keele Wall along the Bloor-Danforth subway line, from Dundas West station to Keele station. (The work starts behind the Midas at Indian Grove Road, and is best viewed from a subway car.) You can also check out the laneway and parking lot behind Exclusive Paints at College and Spadina, or take a stroll through Kensington Market
In 2010, Rob Ford became 64th mayor of Toronto.

Here is what Rob Ford said about graffiti: "It’s just out of control, nobody likes it, it doesn’t help our city,” Ford told the National Post. He put Cesar Palacio, the new head of the city’s municipal licensing and standards division, in charge of eradicating all downtown graffiti within the next six months. They’re targeting bridges, main streets, hockey rinks, community centres and utilities.

Here is list of links to different sources about what was going on since then:

  • During the 2010 Toronto mayoral campaign last year, Rob Ford pledged that he would clean the city streets, including graffiti that has plagued Toronto.

  • Feb 7, 2011 - Toronto mayor pushing graffiti-free city
  • April 7, 2011 - Mayor Ford declares war on graffiti
  • April 8, 2011 - Toronto Mayor Rob Ford Buffs Graffiti
  • April 29 -  Message to "Rob Ford" at northwest corner of Queen and Ossington
  
  • March 4 - another article
  • March 13, 2011 - The Toronto graffiti writers Jaro and Paces leave a message to the Toronto mayor.
  • May 12, 2011 - Graffiti community fuming over crackdown


By other words - it is war going on between graffiti artists and Toronto mayor. The question is "What is next?".


P.S.
I made following video based on pictures from that street and going share all images in good quality at flickr:

http://www.youtube.com/watch?v=sz5Wnp6bYjU

Thursday 26 May 2011

Pigs are dying at downtown Toronto

Hi,
I am working downtown Toronto close to Bathurst & King. I saw many times trucks, at cross of  Strachan Avenue and Wellington Street West , loaded with live pigs.


I made a video and started look for meat processing plant around that area and found it:
Quality Meat Packers Ltd. is a privately-held company founded in 1931 by Nathan Schwartz and is located on 2 Tecumseth St. The slaughterhouse, near King and Bathurst, has the capacity to kill up to 6,000 pigs each day
The source is this link: http://torontopigsave.wordpress.com/


Just think about it - 6000 pigs can be killed during one day at that location. It is terrible.

Use Visual Studio 2010 Ultimate for Data Generation - Tips and Tricks

Data generation is very important aspect of software development.
It helps developer understand application behaviour with future data grow and improve performance of database queries or apply caching mechanism in application.
I used one of the commercial products for data generation in a past. It was RedGate - pretty awesome tool.
Now, if you have license for the Visual Studio 2010 Ultimate edition,  you are able to use built in tool for data generation. Only Ultimate edition has this feature and it is part of the database project.
In this sample I will use new database with 2 tables - product and poductcategory.
In real life these tables are very small. I would use orders or something like that.
I just want show you how to use data generation on a table with foreign keys.


Here are steps to generate data:
1) First of all, Prepare SQL statements to create tables.

This script you will run only once.
Another script will clean-up generated data and you will execute it many times.
--create tables:
CREATE TABLE [dbo].[Product](
 [ProductId] [int] IDENTITY(1,1) NOT NULL,
 [SKU] [nvarchar](50) NULL,
 [ProductName] [nvarchar](100) NOT NULL,
 [Price] [money] NULL,
 [ProductTypeId] [int] NULL,
 CONSTRAINT [PK_Product] PRIMARY KEY CLUSTERED
(
 [ProductId] ASC
)WITH (PAD_INDEX  = OFF, STATISTICS_NORECOMPUTE  = OFF, IGNORE_DUP_KEY = OFF, ALLOW_ROW_LOCKS  = ON, ALLOW_PAGE_LOCKS  = ON) ON [PRIMARY]
) ON [PRIMARY]
CREATE TABLE [dbo].[ProductType](
 [ProductTypeId] [int] IDENTITY(1,1) NOT NULL,
 [ProductTypeName] [nvarchar](50) NOT NULL,
 CONSTRAINT [PK_ProductType] PRIMARY KEY CLUSTERED
(
 [ProductTypeId] ASC
)WITH (PAD_INDEX  = OFF, STATISTICS_NORECOMPUTE  = OFF, IGNORE_DUP_KEY = OFF, ALLOW_ROW_LOCKS  = ON, ALLOW_PAGE_LOCKS  = ON) ON [PRIMARY]
) ON [PRIMARY]

--clean up both tables
truncate table Product
delete from ProductType
I use "delete" sql statement against ProductType because you cannot use "truncate" when other tables have reference key to this one.

2) Create Visual Studio 2010 database project:
Run Visual Studio. Open server explorer. If server explorer is not visible at your screen, press Ctrl-W,L.
In server explorer add new connection to database. You will use that connection in database project.


Create new project by using "File->New->Project" menu option.
I am currently using SQL 2008, so I selected "SQL Server 2008 Database Project".


Next step is to import database schema into project. You need right mouse click on project and select "Import Database Objects and Settings".


In opened window select connection, which you created in server explorer.


When all database objects were imported you can create "Data Generation Plan".


After you finish previous step you will see list all of tables from database.
For better understanding how data will be generated in database, you should turn on data generation preview by right mouse clicking on table view and selecting "Preview Data Generation" from popup menu.


After you done all steps above, you should see screen like this:


case 1: ProductType table will contain randomly generated data

specify number of rows to be generated in every table and press F5 or use following menu:

Select connection string


In next dialog box select yes:


After data generation is complete you will see data generation result:


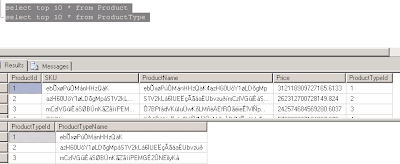
To check generated data in database, run following sql statements:
select top 10 * from Product
select top 10 * from ProductType
you will see following result:


case 1a: The smae as above but you need ratio between reference table and main table

For example: for every inserted row in ProductType you want generate 100 products.
To Achieve this task you need set
1. Related table
2. Ratio between main table and reference table
3. Number of rows in reference table


you will notice that every time you change number of rows for the "ProductType" table, number of rows for the "Product" table will be adjusted according ratio.

Run data generation by pressing F5. On prompt to delete existing data select "YES". After data generated check database.


case2: You have to use pre-defined refernce data

Let's say your web application uses predefined list of product types such as "Default", "Downloadable" and "Gift Certificate". In code you already created enumeration for that. It means that you cannot use randomly generated data in that table.

What I am recommending is to create SQL script, which you can run even after data deletion:

--clean up both tables
truncate table Product
delete from ProductType
--insert product types
set identity_insert ProductType on
insert into ProductType (ProductTypeId, ProductTypeName) values (1,'Default')
insert into ProductType (ProductTypeId,ProductTypeName) values (2, 'Downloadable')
insert into ProductType (ProductTypeId,ProductTypeName) values (3, 'Gift Certificate')
set identity_insert ProductType off


Next step is to update your data generation plan. First of all you have to set number of records to be generated to 0 for the table "ProductType". After that you should uncheck checkbox for the "ProductType" table and set related table to "None" as shown below.


You accomplished first task - rows will not be inserted into "ProductType" table.

Another task, which you need to achieve is to insert data in "Product" table "ProductTypeId" column and do not break foreign key constrain. Currently, "ProductTypeId" column is set up with "Foreign key" data generator, which works only when data is being inserted in reference table, but we turned off that option. You should select another generator. The best option is to use "Data bound generator". This type of generator can query data from another source, like database table and use different distribution mechanism:


There is another, similar, generator - "Sequential data bound generator". The difference is that "Data bound generator" makes sql query before start insert rows in a table one time and "Sequential data bound generator" makes sql  query every time before it inserts row in a table.

Once you selected "Data bound generator" you should set its properties.
1. you need select connection string from dropdown list box in "Connection information". you can add new connection string right there if your refernce data located in another database. In our case you should select connection string, which we configured in "Server explorer".
2. you need to write sql statement to select "ProductTypeId" from "ProductType" table.
You can write statement like this "select * from ProductType" or like this "select ProductTypeId from ProductType". If you used first one you should select what field you are going to use from the result set in "Generator Output" as shown below:

3. you should also set seed value to 1 in our case.
4. Distribution - it is up to you

The configuration is done. Just start data generation by pressing F5. Here is very important thing, which you have to do on this screen - you should select "No".

If you don't do it, you will loose data in reference table and load data process will fail because of constraint violation. Finally, you should get following result:


As for price, you can update min and max value for that in "Money generator" for the "Price" column.

Wednesday 25 May 2011

Pre-Authorized payments (PAD and PAC) - try do not use it.

Hi,
Here is my new finding about pre-authorized payments.
Couple words about what it is you can find here:
http://en.wikipedia.org/wiki/Direct_debit
http://www.canadabanks.net/default.aspx?article=Pre-Authorized+Debit
Many of you have probably membership with sports clubs, which require sign membership forms and sign pre-authorized form from your bank.
Telecommunication companies do it as well, such as Rogers, Bell ... etc.
The most dangerous companies are small companies without permanent business address.
Pre-authorized form, signed by you, gives them permission to take money directly from your account (as much as they want).

Here is short description of my case:

It was not membership in a gym, but another company was keep charging me with different amounts every month.
I made a mistake - signed pre-authorized form from my TD Canada Trust bank.
I thought that it should be easy to stop such payments but I was wrong. I went to TD bank,
which is located downtown Toronto. I asked teller to make such operation with my account, but what he told me was shocked me:

1) If you pre-authorize another company or financial institution take money from your account - you lose control. Simple case is automatic money withdrawal, based on bill for mobile services.
If you decide do not continue use their services, they still can get money from your bank (as much as they want), especially, if you have contract with them.

2) To stop payments you can call to company, which you gave permission to take money from bank account and "gently" ask them to stop doing that.
In some cases you have to fill special forms and bla bla bla...If it is small company you can be in a trouble.

2) Technically, you can stop such payments if you know exact amount to be taken and name of financial institution and in perfect scenario - date when next payment will be taken.
You can call to your bank and verbally say that you want to do it or use bank internet services,
such as "Easy web" for TD Canada Trust.


By other words - it is doable if you know exact amount.
But .... If you have being charged periodically with different amount - no WAY!!!!!!!!!!!
This method will not work !!!!!

My recommendations:

1) Use cheques to pay for your services or pay bills rather than use pre-authorized form of payment - think before you sign pre-authorized form.

2) In case if you are in such kind of trouble, try to find answers by following link:
http://www.helpwithmybank.gov/faqs/banking_autowithdrawals.html
and ... if nothing works - close account and open another one.

P.S.
My solution was to close bank account.
Please, let me know if you know other options, which work in Canada.

Tuesday 24 May 2011

How to make barn foundation

In this story I will show you how we (My friend Alex and me) made barn foundation.
Last year Alex bought piece of land close to Orangeville, Ontario and this year he decided build a log house. Before build a house it was make sense to build barn. In a barn you can store any tools or even live in it.
Here is how we started:


We dug 6 pits in a ground by one of this kind of shovel:


We decided do not dig very deeply and put flat stone on the base of it. We bought it a "Home Depot" by ~2CAD.


First floor of the future barn supposed to be a little bit up from the ground. According to that, we cut first bar. My friend Alex is cutting bar on the next picture:


Put it in a center of pit and centered by level, which was bought at "Canadian Tire" store and it was the cheapest model.

On a field we found many stones and put them by layers in a pit around the bar. Some people use concrete for that but we put soil between stone layers and pack it. May be it is our mistake do not use concrete, but hundred years people did it the same way.
Here it is - our first bar is ready!!!


Next step was to use ties to make a proper level according to ground. We used regular rope with level bound to it:


We used hummer to dig in small wooden stick 1"x1" right across pits, bound a rope to it and tight it up.


It is time to install 3rd bar.
All other steps where similar to previous one:

4th bar:


5th bar:

6th bar:


When we finished installation of the foundation we decided to check how good we made it.
We took one of the wall pieces of the future barn and put it on a base. It was good adjusted!


Finally Alex decided to make extra tests :-)


In next articles I will describe how we did barn frame.

Sunday 22 May 2011

2011 May - Pike fishing at Little Lake, Ontario

Hi,
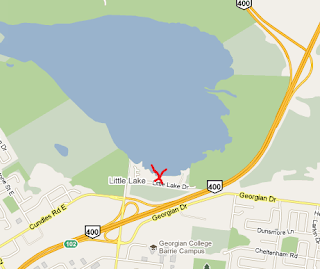
Here is short story about pike fishing in Ontario. I was at my friend's house on Friday night and he got a phone call with an offer to go for fishing on next morning. It was pretty close to Toronto - Little lake, Ontario and we decided - let it be. If be more accurate, it is exit 102 at highway 400:


Our friends rented big boat, so it could fit 5 people. It was not too late and we went to Canadian Tire to buy new lures and line.

On next morning we woke up a little bit later and we were at place right at 7AM. We spent about 3 hours by fishing. In the result we cought 9 pikes. Lake was overloaded with fishermen. It is not surprise because it is very close to Berrie.


I, personally, catched 3 pikes by using this type of lure:


We could catch more if we would not sleep too much - fish don't like wait.
We came back home around 11:30AM and I cooked fish in an oven - right at lunch time:


Framework 4.0 WCF basic authentication sends 2 requests

Hi Guys, If you configured your end-point to use basic authentication you probably saw 2 requests coming to server.
Just open fiddler and you will see something like this:


and here is the second request, which how it suppose to be:


It means that Authorization header has not been passed first time.
There are 2 options to resolve it.

Option Number 1
You can use OperationContextScope like shown below.


System.ServiceModel.Channels.HttpRequestMessageProperty httpRequestProperty = new System.ServiceModel.Channels.HttpRequestMessageProperty();
httpRequestProperty.Headers[System.Net.HttpRequestHeader.Authorization] = "Basic " +
    Convert.ToBase64String(Encoding.ASCII.GetBytes(svcClient.ClientCredentials.UserName.UserName + ":" +
    svcClient.ClientCredentials.UserName.Password));
using (System.ServiceModel.OperationContextScope scope = new System.ServiceModel.OperationContextScope(svc.Service.InnerChannel))
{
    System.ServiceModel.OperationContext.Current.OutgoingMessageProperties[System.ServiceModel.Channels.HttpRequestMessageProperty.Name] = httpRequestProperty;
    //Make service call.....
    return svcClient.IsEmailAddressExist(emailAddress);
}

The benefit of using this method - you have control on operation level, so if you service has 20 operations and you need apply this behavior to one one - you can do it as shown above.  But, there is bad thing about it - if your end-point will change binding settings, like basic authentication will be removerd, you have to update your source code. I would recommend this approach only if your service and-point is configured with basic authentication till end of its days :-) nobody can guarantee it.


Option Number 2

If we started talk about flexible end-point configuration without touching source code, this method will be more suitable - Use custom end-point behavior and message inspector.
The benefit of this method that you can easily turn it on and off via application configuration without code recomplication.

First of all, you have to create custom message inspector, which will be responsible for custom header injection like shown below. in Framework version lower than 4.0 I would use IProxyMessageInspector, but this sample is based on Framework 4.0 and I am using IClientMessageInspector.

using System;
using System.Collections.Generic;
using System.Linq;
using System.Text;
using System.ServiceModel.Dispatcher;
using System.ServiceModel.Channels;
 
namespace ServiceDataProviders
{
    /// <summary>
    /// current message inspector injects "Authorization" header, which prevents double server calls
    /// with 401 and 200 response codes.
    /// </summary>
    public class CustomProxyHeaderMessageInspector : IClientMessageInspector
    {
 
        public void AfterReceiveReply(ref System.ServiceModel.Channels.Message reply, object correlationState)
        {
            //throw new NotImplementedException();
        }
 
        public object BeforeSendRequest(ref System.ServiceModel.Channels.Message request, System.ServiceModel.IClientChannel channel)
        {
            try
            {
                HttpRequestMessageProperty httpRequest;
                if (request.Properties.ContainsKey(HttpRequestMessageProperty.Name))
                {
                    httpRequest = (HttpRequestMessageProperty)request.Properties[HttpRequestMessageProperty.Name];
                }
                else
                {
                    httpRequest = new HttpRequestMessageProperty();
                    request.Properties.Add(HttpRequestMessageProperty.Name, httpRequest);
                }
                if (httpRequest != null)
                {
                    httpRequest.Headers.Add(System.Net.HttpRequestHeader.Authorization, 
                        "Basic " +
                        Convert.ToBase64String(Encoding.ASCII.GetBytes(
                        System.Configuration.ConfigurationManager.AppSettings["SVCUserName"] 
                        + ":" +
                        System.Configuration.ConfigurationManager.AppSettings["SVCUserPassword"]
                        ))
                        );
                }
            }
            catch (Exception ex)
            {
                //TODO: add logging for the CustomProxyHeaderMessageInspector
            }
            return request;
        }
    }
}

As you can see, I am using application configuration settings to assign use name and password:
SVCUserName and SVCUserPassword. It can be anything in your case. 

Second - you will have to create end-point behavior, which will register message inspector at end-point level. It means that all operations calls will be affected by that.

using System;
using System.Collections.Generic;
using System.Linq;
using System.Text;
using System.ServiceModel;
using System.ServiceModel.Description;
using System.ServiceModel.Dispatcher;
 
namespace ServiceDataProviders
{
    /// <summary>
    /// current class registers CustomProxyHeaderMessageInspector, which injects Authhorization header
    /// </summary>
    public class CustomEndpointCallBehavior : System.ServiceModel.Configuration.BehaviorExtensionElementIEndpointBehavior
    {
        #region BehaviorExtensionElement
        public override Type BehaviorType
        {
            get { return typeof(CustomEndpointCallBehavior); }
        }
 
        protected override object CreateBehavior()
        {
            return new CustomEndpointCallBehavior();
        }
 
        #endregion BehaviorExtensionElement
 
        #region IEndpointBehavior
 
        public void AddBindingParameters(ServiceEndpoint endpoint, System.ServiceModel.Channels.BindingParameterCollection bindingParameters)
        {
            //throw new NotImplementedException();
        }
 
        public void ApplyClientBehavior(ServiceEndpoint endpoint, ClientRuntime clientRuntime)
        {
            //throw new NotImplementedException();
            clientRuntime.MessageInspectors.Add(new CustomProxyHeaderMessageInspector());
        }
 
        public void ApplyDispatchBehavior(ServiceEndpoint endpoint, EndpointDispatcher endpointDispatcher)
        {
            //throw new NotImplementedException();
        }
 
        public void Validate(ServiceEndpoint endpoint)
        {
            //throw new NotImplementedException();
        }
        #endregion IEndpointBehavior
    }
}

Current service and point behavior implements IEndpointBehavior in older version of frawework, I would use  IChannelBehavior. IEndpointBehavior implements main logic to register message inspector. You don't have to implement BehaviorExtensionElement if you do not have plans to use application configuration and add behavior dynamically during run-time, but if you want make it configurable via config file you have to do it.

Here is a sample how you can add behavior during run-time:

svcClient.Endpoint.Behaviors.Add(new CustomEndpointCallBehavior());

Here are instructions how to add custom behavior in application configuration:

inside
<system.serviceModel>
you should add following:


if you run your code now you should see only one request, coming to server!!! Good luck!
    <behaviors>
      <endpointBehaviors>
        <behavior name="SVCBehavior">
          <HttpAuthHeaderBehavior/>
        </behavior>
      </endpointBehaviors>
    </behaviors>
    <extensions>
      <behaviorExtensions>
        <add name="HttpAuthHeaderBehavior" type="ServiceDataProviders.CustomEndpointCallBehavior, MyDLL, Version=1.0.0.0, Culture=neutral, PublicKeyToken=null" />
      </behaviorExtensions>
    </extensions>

plus you have to add behaviorConfiguration attribute to your end-point configuration. here is a sample

      <endpoint address="http://127.0.0.1/CustomerProfile" binding="basicHttpBinding"
        bindingConfiguration="SVCBinding" contract="serviceCustomerProfile.CustomerProfilePortType"
        behaviorConfiguration="SVCBehavior"
        name="CustomerProfilePort" />
After you make all these changes to your project you should see in a fiddler only one request to server. Good luck!